Bidirectional communication via WebSocket on Microcontroller[STM32Nucleo]

In the previous article "Bidirectional communication via WebSocket on Microcontroller", I explained how to develop IoT for devices more closely by installing a web server in MCU and accessing it from a browser such as a PC or smartphone without using a dedicated application.
Browsers usually communicate with devices according to the HTTP protocol, but basically, it is only from the browser side that something is requested. The device only responds as a server to requests from the browser. For example, it is not possible to send data in the device to the browser and have it displayed in real time.
Although it is possible to send data within a device to a browser using only the HTTP protocol to periodically refresh pages or to display pseudo-dynamic displays (Comet, SSE, etc.), HTTP is a very wasteful communication protocol because it adds a large size header even to send a small amount of data.
I would like to implement WebSocket on MCU because WebSocke, another protocol that compensates for the shortcomings of HTTP, enables real-time bidirectional communication between a browser and a device as if it were TCP socket communication. The aim is to make it accessible by explaining with concrete examples what is difficult to introduce in a small application because of its high cost.
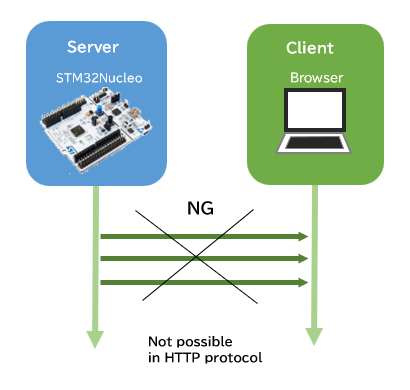
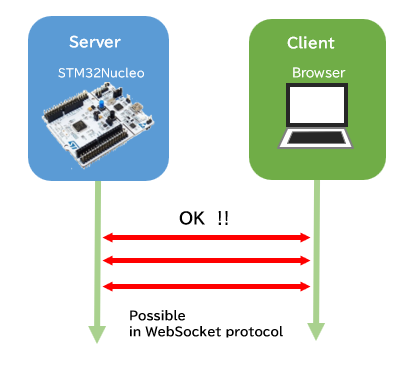
Table of contents
What is WebSocket?

In a word, WebSocket is a protocol that compensates for the shortcomings of HTTP by allowing real-time bidirectional communication in small-sized data frames.
WebSocket is not so new a protocol, but to use it, the browser must support it. This is not a problem since almost all familiar browsers now support it.
The details of a general explanation of WebSocket are the specialty of specialized web engineers, and here we are more on the side of applications outside the field, so we will limit our explanation to the parts that are specific to the realization of embedded MCU systems.
Embedded engineers may have difficulty implementing WebSockets if they are not accustomed to using HTML and JavaScript, which are slightly different from embedded programming.
Most of the Websocket information available in the world is related to articles on the Web, and the only examples of WebSocket applied to embedded microcontrollers can be found in Aruduino systems with the ESP series of WiFi modules.
If it is on the web, a platform like Node.js can be used because of the availability of a file system, but it cannot be adopted for an embedded MCU without a file system. In addition, the Arduino development environment has a wealth of information and libraries available, but there are few examples of applications for the STM32 Cortex-M3 microcontroller, and while there are some libraries available, they have little information and are difficult to use. This was one of the difficulties.
Steps to establish WebSocket
The trigger for starting WebSocket is to send a WebSocket request written in JavaScript embedded in HTML from the client browser. This can be done either by issuing a request when the HTML page is launched, or by issuing a request when the connection start button created in the page is pressed.
It is not difficult to understand how WebSocket communication works, but it is quite difficult to implement for the first time. The biggest challenge in implementation is generating the access key to return to the browser from the WebSocket key issued by the browser.
Once the access key is generated, all that is left is to make full use of HTML and JavaScript, which may not be familiar to embedded systems people, but those who are familiar with web programming should have no problem.
I will now review the steps to establish a connection for WebSocket communication.
The following diagram shows the flow of establishing a WebSocket connection, starting with accessing the server from a browser.
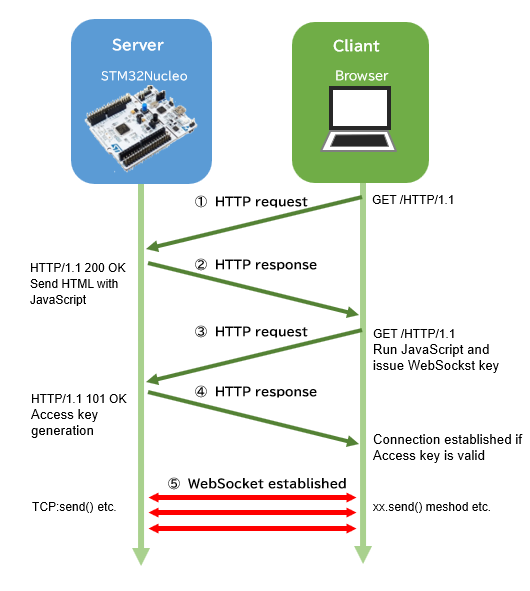
(1) First, when an IP address/port is specified in the browser to access the server as usual, an HTTP request is sent from the browser to the server.ます。
(2) The server receives a GET method from the browser and returns a response, in which a request to start a WebSocket written in JavaScript is embedded. The important point is to once disconnect communication here.
(3) After a few seconds, the browser executes the JavaScript in the response sent by the server and sends an HTTP upgrade request containing a WebSocket key to the server.

(4) When the server recognizes that the request from the browser is a WebSocket, it extracts the WebSocket key, generates an access key, and returns it to the browser.
(5) If the browser can certify that the access key returned from the server is a valid one, it establishes a WebSocket connection and fires an open event.
This is all that is required to establish a connection. Now the server and browser can communicate in both directions using the Websocket protocol. The rest is non-blocking socket communication. The flow itself is simple enough to understand, but there are many hurdles to overcome in order to implement it, so we will explain them one by one.
They say that when an event occurs in event-driven programming, it is called firing.
Web page with embedded WebSocket request
When WebSocket is initiated, it differs from the normal case in that after receiving an HTTP request from the browser, the WebSocket request is embedded in the message body of the response with JavaScript.
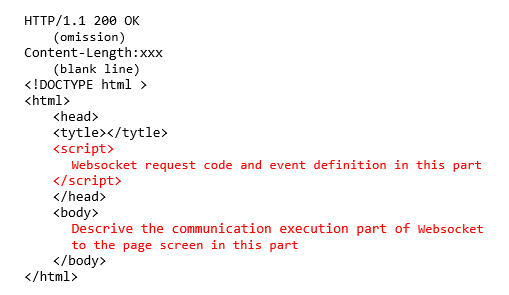
The code to start a WebSocket is roughly formatted and begins by creating a WebSocket object. The object name can be specified arbitrarily. In the sample example below, we use wsocket.
Embed the following JavaScript WebSocket request code in the header of the request.
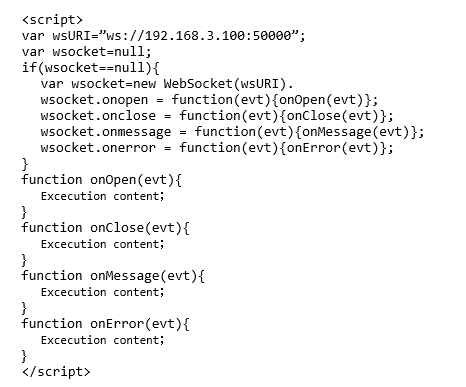
WebSocket events are like interrupts in embedded programming and are registered at the same time when a WebSocket object is created. The content defined in the event handler in advance will be fired at each of the following events during WebSocket execution.
- open Event: onopen event Handler Property
Occurs when a WebSocket connection is opened - close Event: onclose event Handler Property
Occurs when a WebSocket connection is disconnected - message Event: onmessage event Handler Property
Occurs when data is received via WebSocket - error Event: onerror event Handler Property
Occurs when a WebSocket connection is disconnected due to an error
The WebSocket methods are executed when the browser sends data and disconnects the WebSocket connection at an arbitrary time.
- send Method: wsocket.send(data) is for sending data
- close Method: wsocket.close() is for disconnecting WebSocket connections
WebSocket events and methods are written in JavaScript code, and the processing content is tailored to the application.
Other properties readyState can be used to monitor the connection status and handle disconnections.
0: CONNECTING Connections not yet established
1: OPEN Connections established
2: CLOSING Connections closing
3: CLOSED Connections closed
Ex.:var connectionstate=wsocket.readyState //0 - 3
Access key generation from WebSocket key
Executing the WebSocket request code on the browser side sends an HTTP upgrade request containing the WebSocket key to the server side.
The main point for establishing a WebSocket connection is to generate an access key from the WebSocket key passed from the browser.
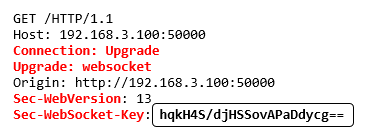
The enclosed 24-character code is the key issued by the browser for the WebSocket connection. As an example, a server recognizes a WebSocket request if it finds "Sec-WebSocket-Key" in the head of the received GET request before the blanks, and then it will send the 24-character key (xxx…. xxx..xxx==) is extracted.
Next comes the biggest challenge: generating an Access key for the WebSocket key of the request.
The access key is expressed as "the value obtained by concatenating the browser-generated key given in the request with the fixed value "258EAFA5-E914-47DA-95CA-C5AB0DC85B11", performing an encryption called SHA-1 hashing, and Base64 encoding. The following table shows the data.
It is difficult to understand what the access key definition is when you see it for the first time, but to explain, the key given by the browser is combined with a code called GUID, then encrypted using the SHA1 method to generate a 20-digit hash value, which is further encoded using BASE64 encoding.
When I first tried to generate access keys, I had no idea what a hash, SHA1 or BASE64 was. Once I realized that these were terms and tools for encryption and coding, I finally knew what to do, but the content of the encryption itself was of an inorganic nature and I still don't understand it.
Procedures for generating hash and BASE64 encoded values
- Browser-generated keys:
Extract only hqkH4S/djHSSovAPaDdycg== from the request header - GUID concatenation (using standard function strcat):
Concatenated the GUID to the extracted key and set hqkH4S/djHSSovAPaDdycg==258EAFA5-E914-47DA-95CA-C5AB0DC85B11 - Generate hash value SHA1 (20-digit/40 characters, hexadecimal) (hashing):
Hashing of the GUID concatenated key yields 1c10aa3dd498c5bfb39a95c5c10277e6770f28c1 (binary) - BASE64 encoding (encoding) of 20-digit hash value:
Encoding a 20-digit SHA1 hash value called BASE64 yields HBCqPdSYxb+zmpXFwQJ35ncPKME= (28 characters text)
The procedure for generating an access key is as described above, but since the algorithm for generating a SHA1 hash value is difficult to understand, you should use some general-purpose library instead of doing this all by yourself.
As for BASE64 encoding, the content is not so esoteric, but there is a lot of library information on this as well, so it may be in your best interest to use it.
Please be aware that the keys exchanged between the browser and server are text, but the hashing process is done in binary.
The validity of the access key for a WebSocket key can be checked using a conversion tool available on the net.
WebSocket connection establishment
Once the access key is generated, an HTTP upgrade response is returned to the browser to establish a WebSocket connection.
The format of the response should be as shown in the example below. The status line in the first line of the response can be either "HTTP/1.1 101 Switching Protocols" or "HTTP/1.1 101 OK".
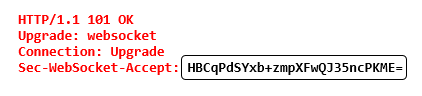
When the browser recognizes that the generated access key is valid, a WebSocket connection is established and bidirectional communication using the WebSocket protocol begins. This means that a handshake has been established between the server and the client (browser).
Once established, the open event is fired and the defined event content is executed. For example, the onopen event fires the "Websocket Connect! message on the onopen event.
How to send and receive data via WebSocket
Once a WebSocket connection is established, bi-directional communication is possible between the browser and server at any given time. WebSocket communication can handle not only text but also binary data.
Data is handled during transmission and reception according to a format called WebSocket data frames.
For more information on data frames, please visit the website at the link below.
Quote. RFC6455 The WebSocket Protocol
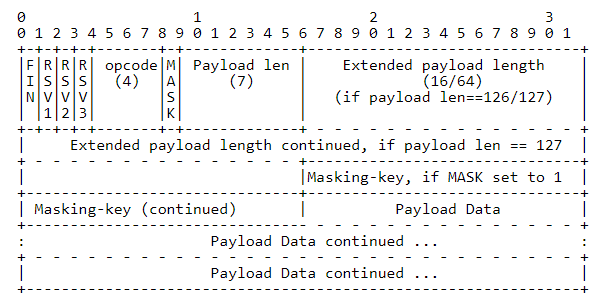
It is relatively simple if the data to be sent at one time is limited to 127 characters or less, either text or binary.
The format of a data frame consists of blocks of 1-byte units: the first byte block specifies whether the communication data is the last packet and the type of data; the second byte block specifies whether the data is masked or not. and data length.
As for whether the data is masked or not, it is a rule that a mask is added to the data from the browser and no mask is added to the data to the browser.
It is difficult to explain in words, but it will be easier to understand if you check with specific examples of application of data to be sent and received, so we will explain in the case of sending and receiving.
Data transmission from browser to server
As a concrete example, let's check the case where a browser sends the text string "test". Transmission and reception are performed by TCP socket communication.
The send method is used for sending from the browser.
Execute send Meshod wsocket.send(”test").
For a 4-character text, the browser sends a WebSocket data frame for 10 bytes. Assuming that the TCP data buffer to be received on the server side is data_buffer[], an example of the data actually read into this receive buffer is shown below.

Since the 4-character text data is a single packet, the first byte block data_buffer[0] is 0x81 in hexadecimal since the first bit FIN is 1 and opcode is 1 for text data.
The second byte block data_buffer[1] is data from the browser with a mask, so the first bit MASK is 1 and the data payload length is 4, so it is 0x84 in hexadecimal notation.
The 3rd-6th byte blocks data_buffer[2]-[5] are mask keys added by the browser. These will change each time the same data is sent again.
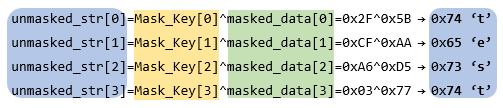
The number of characters in the seventh and subsequent byte blocks data_buffer[6]-[9] are mask-coded into the text data sent by the browser. The coded data is decoded using a mask key to obtain the extracted data unmasked_str[i].
The extracted data unmasked_str[i] is obtained by UnMasking (decoding) by XOR (logical operation) of Mask_Key[i] and masked_data[i].
unmasked_str[i]=Mask_Key[i % 4]^masked_data[i]よりデータ取得
Browsers have other codes to send besides arbitrary text data and binary data. As an example, let's check the data exchanged when wsocket.close() is executed with the close method.
The data sequence sent by the browser in this case is a 6-byte data frame that does not contain any real data. The opcode of the first byte block is 0x8 when the close method is executed. The mask key is also sent, but it has no meaning here.
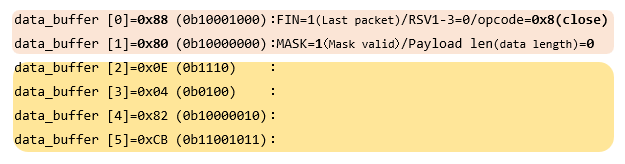
If the first byte block data_buffer[0] received on the server side is 0x88, the browser has executed the close method.
If the first byte block data_buffer[0] received on the server side is 0x88, the browser has executed the close method.
Other commonly used WebSocket opcodes are 0x9 (Ping) and 0xA (Pong). This can be used for handling disconnections, etc.
You may have understood it quickly if you check it with concrete data that is actually exchanged. Next, we will check the transmission from the server.
Since WebSocket communication involves receiving data from the browser at arbitrary times in the same way as TCP socket communication, WebSocket data should be properly handled in the TCP receive process to avoid unexpected errors.
Data transmission from server to browser
Now I will check the behavior of sending the text string "test" in the server to the browser. The case from the server is very simple, since no mask is needed.
I will check the case where text data *str_send="test" in the server is sent to the browser for display.
When sending 4-character text, no mask is used, and the data format to be sent is specified in the first and second byte blocks of the WebSocket data frame, followed by the text data.
Compared to the HTTP protocol, the amount of information to be sent is smaller because of the smaller headers, especially during transmission. The smaller the data to be sent, the more pronounced the difference.


The file is sent to the browser by TCP send() (depending on the TCP processor).
The onmessage event is fired when data is received by the browser, so please set up the processing you wish to perform, such as displaying text.
A feature of WebSoket is that these outgoing blocks can be sent at any time and reflected in the browser.
WebSocket test program
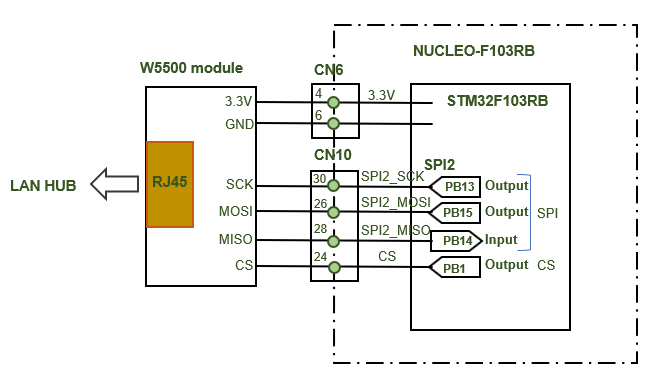
The wiring is the same as before when checking the contents on the actual device.
Specifying the IP address/port of the server from a browser opens the HTML page described in the body message.
As in the previous article, this is the case of MCU without a file system, so in programming, all HTML sent from the server to the browser is hard-coded and stored in an array.
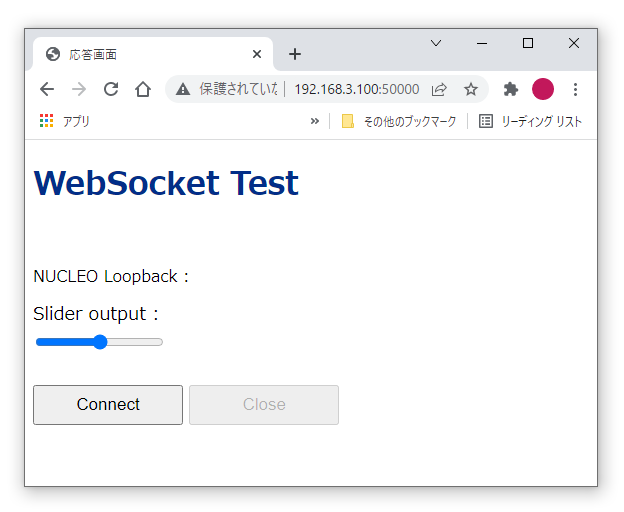
Press the "Connect" button to establish a WebSocket connection. In this sample, the WebSocket request is sent after the "Connect" button is pressed.
Websocket Connectioned!" in the open event fired when a WebSocket connection is established. is displayed in the open event that is fired when a WebSocket connection is established.
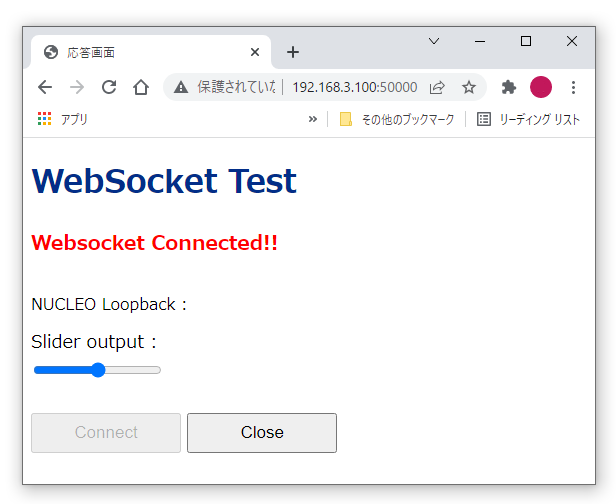
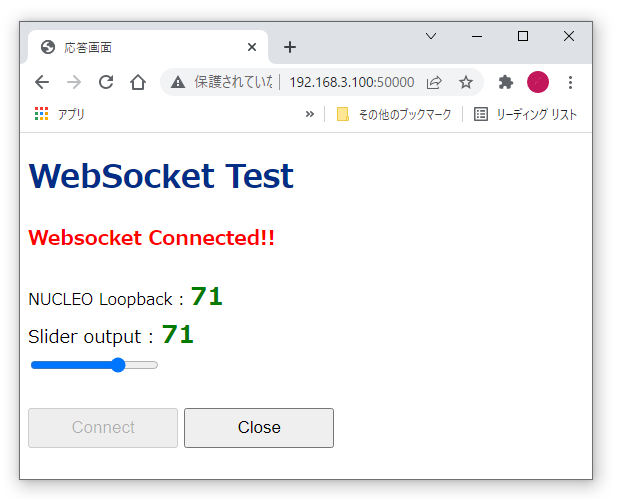
When the HTML slider is operateed, the "Slider output" displays the numerical value of the data range set in JavaSript. This data is generated and sent by the browser, so it will be displayed regardless of whether a WebSocket connection is established.
When the slider is operated while a WebSocket connection is established, a numerical value is displayed in "NUCLEO Loopback" at the same time. This is data received by the server and sent back to the browser as is, so the data on both sides are linked almost in real time, which is a characteristic of bidirectional communication using WebSockets.
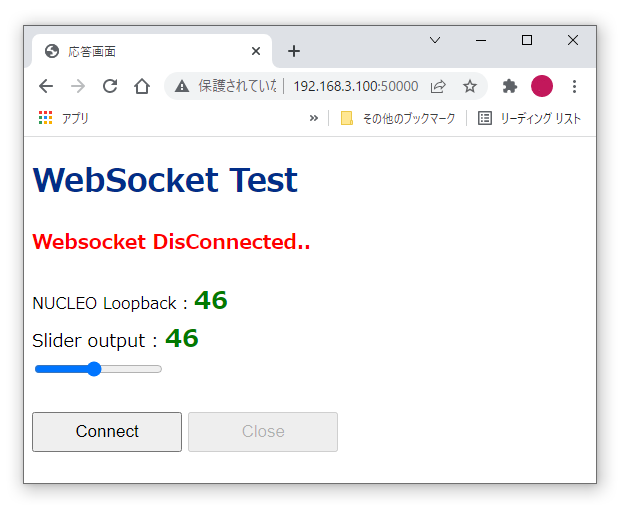
When the "Close" button is pressed, the close method is executed to close the connection, and the "Websocket DisConnected…" message is displayed when the close event fires. is displayed.
Once a WebSocket connection is established, bidirectional communication using the Websocket protocol is relatively simple. However, in actual operation, communication tends to be more unstable than TCP socket communication, so some additional effort is required to achieve stable communication.
The following demo video sends variables in the server to the browser for display. The sampling rate of the transmission is 100 ms.
With this kind of display speed, it could be applied to real-time monitoring of sensor values, etc. that involve movement.
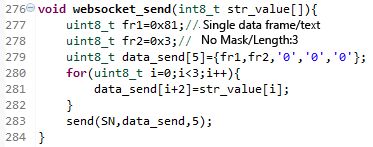
When the sampling rate of the transmission is faster than 150 ms, it is unstable and often stops or disconnects. The system would stop even if a digit in the value changed. As a countermeasure, the data was divided into three byte blocks of data to be sent to the browser, but this has been improved by combining all byte blocks into one and sending them once, and fixing the data length to 3, regardless of the digits of the numerical value.
In this demo video, the count value is converted to a 3-digit fixed-length number (ASCII code) in the server, and the following transmission function is executed in 100ms cycles and sent to the browser.
websocket_send(3-digit number converted to string);
The transmission cycle is unstable when set to 100ms or less, and this speed is a little insufficient for real-time communication in embedded devices, so the advantages of WebSocket are not utilized. I will identify the cause of freezes and disconnections, and if possible, make the realization of more stable and faster communication a future issue.
If anything, WebSocket technology is not for embedded systems, but rather a field in which web engineers who make full use of HTML and JavaScript excel, and I feel that I only struggled because I tried to apply this to embedded systems. Nevertheless, it can be said that using a debugger and packet monitor, which are essential for MCU programming, will allow you to actually check the data exchanged between the browser and the MCU, which will deepen your understanding as well as debugging.
Compared to the HTTP protocol, WebSocket communication tends to consume less memory due to the smaller packets exchanged, and even MCU with a small memory such as the Nucleo-F103RB can function well. The memory consumption in this sample program is about 9k for RAM and 28k for Flash.
This sample circuit is a simple one that simply connects a Nucleo to an Ethernet controller W5500, but since this technology is more software than embedded, it can be used not only for TCP communication, but also for HTTP communication, WebSocket communication, and an infinite number of other applications. It is a technology that is more software than embedded, so it can be used not only for TCP communication but also for HTTP and even WebSocket communication.