How to read the ARM STM32 register map [for advanced users]

Table of contents
Register map

If you use only the peripheral library, you do not need to be aware of the register map, but understanding how the MCU's registers are operated in the library will improve your MCU skills.
From a different perspective, the level of register manipulation without the use of libraries is the most powerful because it allows development without relying on the libraries and tools provided by each MCU manufacturer.
Let's look at how the peripheral library operates the control registers of the peripherals. It is possible to develop MCU without understanding how the peripheral library works as a black box. Moreover, understanding register manipulation is considered very difficult for beginners, especially those who are not very familiar with programming, so you can skip this section.
As an advanced MCU user, you will be able to create applications with smaller program code and faster processing speeds if you can manipulate registers directly without relying on libraries created by the manufacturer. This is not an essential skill, but if you can use it as needed, it will become more applicable and powerful.
Let's trace how the general-purpose input/output GPIOA_1 pin was set as a push-pull output by the peripheral library in the previous section.
The memory map of the peripheral is shown below. In this map, the base address in memory of GPIO port A is 0x40010800 in 32-bit notation.

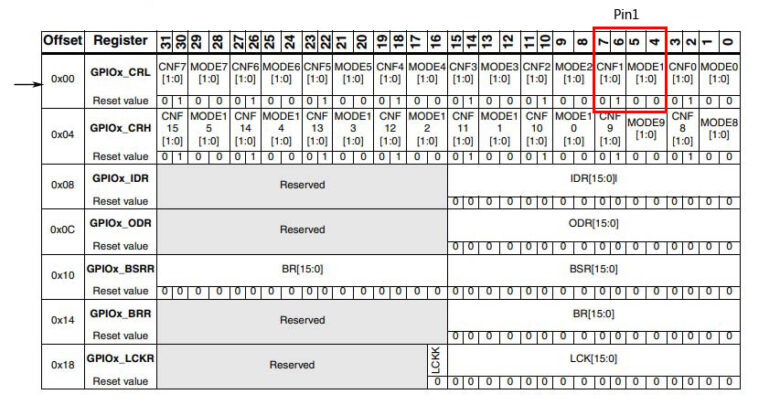
Next, checking the contents of GPIO control registers, there are 7 types of control registers as follows (x=A…G).
- Port Setting Register Lower(GPIOx_CRL)Port0 to 7
- Port Setting Register Upper(GPIOx_CRH)Port8 to 15
- Port Input Data Register(GPIOx_IDR)
- Port Output Data Register(GPIOx_ODR)
- Port Bit set/reset Register(GPIOx_BSRR)
- Port Bit reset Register(GPIOx_BRR)
- Port Setting lock Register(GPIOx_LCKR)
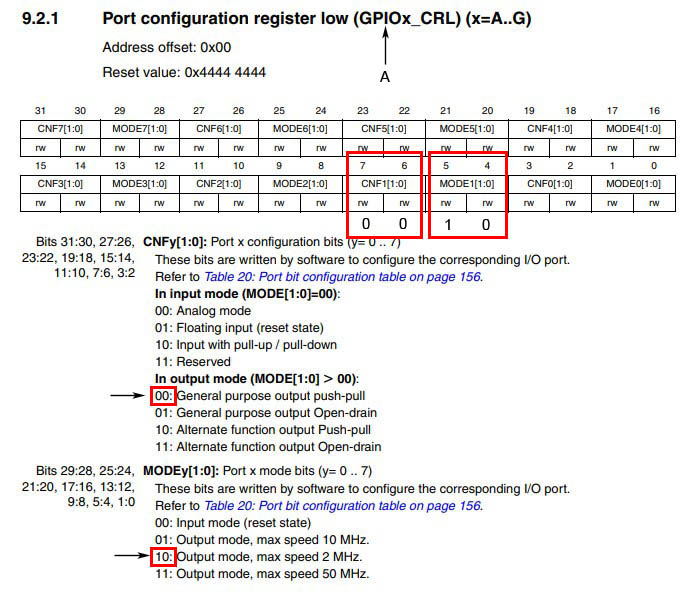
The register that sets the port specification is lower (0 - 7) for the GPIOA_1 pin, so it is set by operating the control register GPIOA_CRL. The address of register GPIOA_CRL is 0x40010800 because the offset is 0x00.
Description in the program using the library
Let's see how the library functions in an actual program.

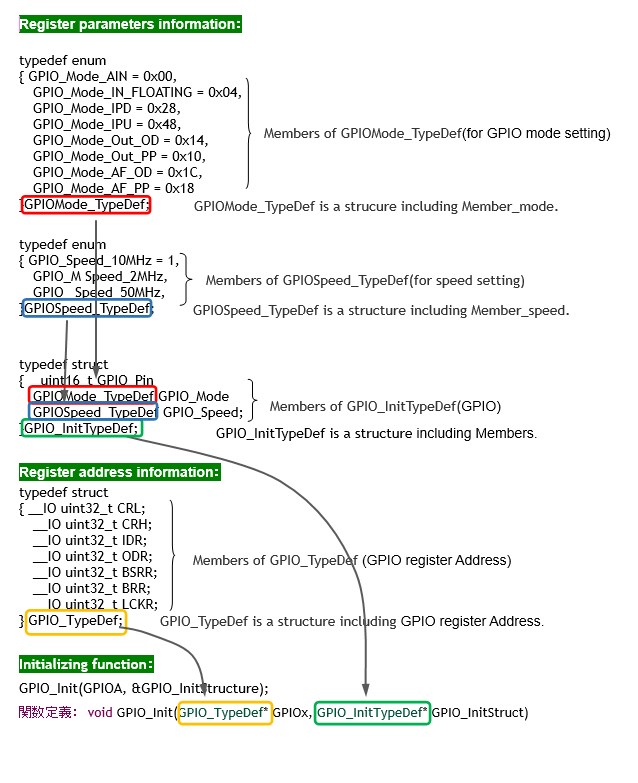
Let's check the details of the parts of the structure that are grouped together. Parameters are grouped by structure for each classification.
About initialization function xx_Init()
Let me explain how register addresses and setting parameters are processed in the initialization function GPIO_Init(GPIOx, &GPIO_InitStructure) to manipulate the registers.
The actual program is the GPIO_init() function in stm32f10x_gpio.c of the GPIO library.
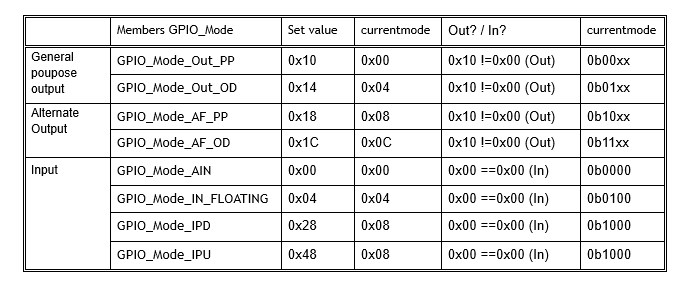
- Mask the lower 4 bits of the structure member GPIO_Mode (&0x0F) and assign a value to currentmode. Next, the upper 1 bits are masked (&0x10) to determine whether it is an input or an output. If it is an output, the lower 2 bits are set to the GPIO_Speed setting value (0bxx).
- GPIO_CRL register (lower 8 bits) Check that all of the pins are not 0 (because if all of them are 0, it means that the GPIO is disabled), write the setting values of CNFn (2 bits) and MODEn (2 bits) to the register in the 4 bits assigned to pins 0 to 7 for each GPIO pin, and Sets how each pin of the GPIO port is used. (n is pin number from 0 to 7)
Repeat the same process for all 8 pins.
- When the set mode is GPIO_Mode_IPD, set the corresponding bit of GPIOx_BRR (GPIOx) bit reset register) to 1 (corresponding bit reset: input pull-down resistor setting).
If the mode set is GPIO_Mode_IPU, set the corresponding bit 1 in GPIOx_BSRR (GPIOx bit set/reset register) (corresponding bit set: input pull-up resistor set).
Repeat the same process for all 8 pins and write to GPIOx_CRL (lower GPIOx configuration register). - Similarly, process GPIOx_CRH (upper GPIOx configuration register) and finish processing the function GPIO_Init(GPIOA,&GPIO_InitStructure);. After that, the same process is performed for the GPIOB to GPIOE ports.
The above is the process performed by the initialization function GPIO_Init(GPIOx, &GPIO_InitStructure).
In the initial setting of peripherals, you identify the address of the corresponding control register, not only GPIO, and write the parameters you want to set, either by using a peripheral library (device driver) or by writing directly to the register.
While the peripheral library is convenient and easy to use without knowing the control registers, it also has redundant parts, so direct manipulation of registers may be necessary to reduce program code size and improve processing speed.
If you are using a high-performance microcontroller with sufficient processing speed and memory size for program storage, you may want to use only the more convenient peripheral library and concentrate on application development.