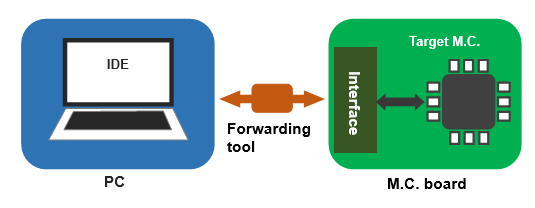
Recommended development environment for learning ARM STM32 [must see for beginners]

Table of contents
- 1 What is a suitable integrated development environment for ARM MCU (STM32) beginners to study?
- 2 Firmware library
- 3 Development Tools for STM32 MCUs
- 4 Building the STM32CubeIDE
- 5 Create a project that incorporates the Firmware library SPL
- 6 Include path
- 7 Compile-Link-Build
- 8 Transfer
- 9 Self and Cross Environments
What is a suitable integrated development environment for ARM MCU (STM32) beginners to study?

After choosing MCU to start learning about MCUs, the next challenge is about MCU development environment.
- What do I need to prepare to create a program?
- What should I do with MCU and peripheral hardware (interface) on which the created program will run?
- How can I use the tool to transfer the created program to the MCU?
I think that's all there is to it specifically.
When I first started embedded systems, I targeted the STM32 MCU and had quite a bit of trouble gathering information on specific tools for development.
The development environment for the STM32 MCUs is so popular worldwide. Therefore, it was difficult to narrow down which development environment was most suitable for me, not because there were no choices but rather because there were too many choices.
Even now, information on development environments, including useful tools, has increased, making it increasingly difficult for beginners to know which one to start with. I would like to introduce some of the tools that I have found to be the best ones to use for the time being, while reviewing the points of choice I have made.
The development environment must run on PC and be free for learning purposes. However, there are a number of free versions of development environments, but those with code restrictions or limited functionality cannot be used.
MCUs are usually developed using an Integrated Development Environment (IDE), a packaged application that provides various functions for software development all-in-one. The IDE includes an editor for writing programs, a compiler for C and other programming languages, an assembler, a linker, a debugger, and other functions.
Using the integrated development environment, developers can concentrate on programming, transferring programs, and executing them with ease.
I has also built an STM32 development environment based on Eclipse, a free comprehensive development environment platform, in order to build a development environment with no usage restrictions. Once stable and flexible, it was easy to use and full of a sense of self-satisfaction, but when the microcomputer specifications were changed, it was quite troublesome and time-consuming to rebuild the project and specify the compiler.
If building a handmade development environment is your hobby, it may be a good idea, but if you want to prioritize your work or study, you should spend your valuable time on acquiring skills and avoid building your own development environment.
Firmware library
A Firmware library called the Standard Peripheral Library (SPL) has been available for the STM32 series for some time. This library is well written, and there are many articles on the Internet and in books that explain how to use it, so you can obtain sufficient information on how to use it. I recommend this library for learning microcontrollers because it is hardware-oriented and concrete.
In contrast, the Firmware libraries in the latest development environment tools have been redesigned to support the latest MCUs (libraries called HAL and LL as opposed to SPL), and therefore should be used for new development of new MCUs in the future.
Also, HAL code is abstracted and should be used after understanding it in SPL. If you use HAL and LL after you have mastered the basics of MCUs with SPL, you will be able to easily transition to HAL and LL. Please sit back and work hard to solidify your foundation.
The common feature of Mbed, a development environment for Arduino and ARM MCUs that transcends the boundaries between manufacturers, is the abstraction of the hardware interface part to enable easy MCU development. The HAL library combined with the STM32's automatic code generation function is a similar environment, and while it facilitates development, it hides the interface part, so I do not think it is suitable for people who want to learn the basics of manufacturing, especially microcontrollers, to use from the beginning.
It is suitable for engineers with a certain level of knowledge and experience to easily and advantageously develop prototypes, for hobby-oriented electronics work that requires only operation even if the contents are not well understood, and for student development sites. If you use MCU in your work, you cannot apply it without the basics, so I encourage you to use SPL, which is close to hardware, for your libraries.
Once you are somewhat familiar with the STM32 microcontroller through SPL, I think it is a good idea to start using STM32CubeIDE the way it is supposed to be used (HAL library and automatic code generation). If you have a good foundation in SPL, it is easy to port to HAL and other platforms.
The technology has undergone a paradigm shift, evolving from vacuum tubes to transistors, LSIs, and MCUs, and knowledge of vacuum tubes, for example, is no longer necessary for engineers today. In MCU development, for example, a decade ago, programs were created in assembly language, a low-level language similar to MCUs, but nowadays, development can be done in C and other languages that are easier to develop without using assembly. In addition, there are cases where it is sufficient to use a completed protocol stack without knowing the contents of the communication protocol stack used to realize the IoT. However, this is not the case for everything. You need to learn the basics you need to know in order to develop, such as transistors, a long-established but important technology, from the time you are a beginner. (Although this may not be required for the purpose of electronic work in hobby.) The fact that the C programming language, a relatively classic programming language among the many development languages available today, is still in use in development is testimony to this.
This is also the reason why we dare to use SPL.
Development Tools for STM32 MCUs
The best IDE for STM32 is(was) TrueSTUDIO, the official IDE of STMicro, which is Eclipse-based and very easy to use. It used to be a development environment with no functional limitations, and everything from the compiler to the debugger is all-in-one, making it easy to achieve everything from program creation to program transfer.
As of this writing, STM32CubeIDE, which integrates the TrueSTUDIO IDE and the STM32CubeMX auto-generation tool, is the mainstream genuine ST Micro IDE. At the same time, TrueSTUDIO has been non-encouragement for new development.
Under these circumstances, we think the best choice is to use this STM32CubeIDE to familiarize yourself with it for future use. However, it does not support the Standard Peripheral Library (SPL), so we will use a manually configured one.
Thus, development environments are updated or fully remodeled as technology evolves. In order to adopt the latest MCUs and start a new development project, it is necessary to have the latest development environment and it is important to acquire the skills to deal with it.
The purpose of this site is to help beginners in embedded technology learn the basics of using MCUs by using the STM32, a 32-bit MCU with an ARM core, as a teaching aid. Then, I will use the STM32CubeIDE integrated development environment with the firmware library SPL for the target MCU.
My personal theory is that I prefer a development environment that is as simple as possible. In this respect, STM32CubeIDE has many features, but it is simple when limited to what you use. When you install the software, all the necessary tools are automatically included, including a dedicated toolchain for the compiler. The only things you need to add manually are the Standard Peripheral Library (SPL) and FreeRTOS. For some applications, firmware can be added as needed, and the basic one is an all-in-one development environment.
STM32CubeIDE also includes the latest tools such as automatic code generation. However, since the code generated is from the HAL library, it would be very useful to use this tool in a development environment where the firmware library SPL can be used and the basic skills of the STM32 have been mastered.
It is difficult to master all the features out of the box, and you will be swamped by tools. It is best to use the latest tools only when there is enough information available on the Internet to make it easy to use them. Save the fun for later.
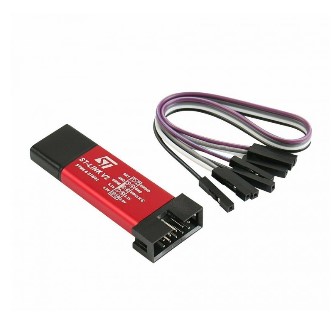
Among the several methods available for writing program transfers to the microcontroller, the SWD method ST-Link/V2 is used. Details are explained in "Development Environment" and "Implementation. ST-Link/V2 is included in NUCLEO-F103RB, which is used as a teaching material board in this site.
Building the STM32CubeIDE
Target MCU:ARM Cortex-M3 STM32F103RB(NUCLEO-F103RB)
Debugger:ST-Link/V2 SWD
Here we build a specification that incorporates SPL and FreeRTOS as a development environment for using the educational material (Nucleo-STM32F103RB) on this site. This is probably the most nimble development environment specification for the STM32CubeIDE.
It takes some initial effort, but once the project is built and works successfully, it can be converted from one application to another.
Although not used in this site, STM32CubeIDE also has an automatic code generation function, so you can try it after you become somewhat familiar with it.
The Internet provides sufficient information on downloading and installing STM32CubeIDE, which is used as a development environment for STM32 microcontrollers, so we will not go into details.
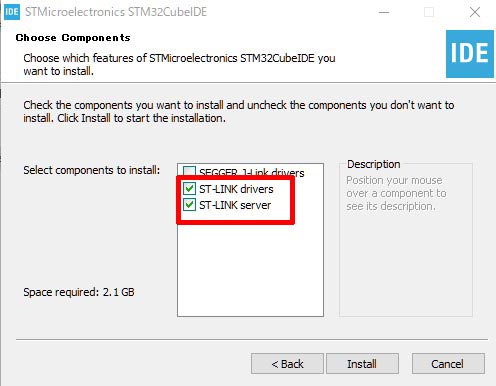
In the mid-installation process, there is a ST-Link related component check box that must be checked. The SEGGER-Jlink driver is not used and may be unchecked.
Click here to see the steps to solve the problem of installation
Create a project that incorporates the Firmware library SPL
- Click on the installed STM32CubeIDE icon to start
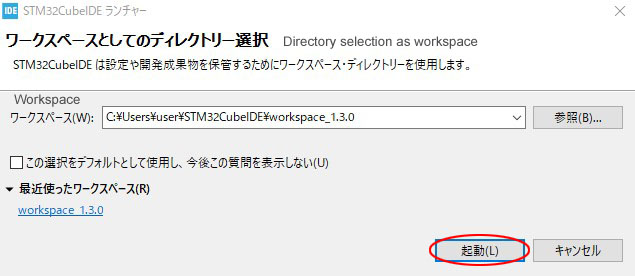
- Specify a working folder workspace. The default is fine until you get used to it.
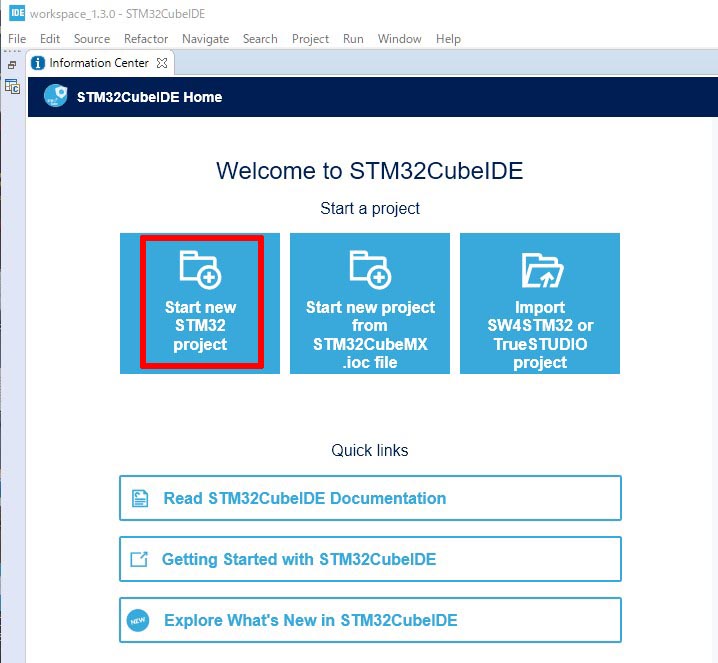
- When this screen appears, select the icon on the left to create a new project. Or, "File"-"New"-"STM32 Project" in the menu bar.
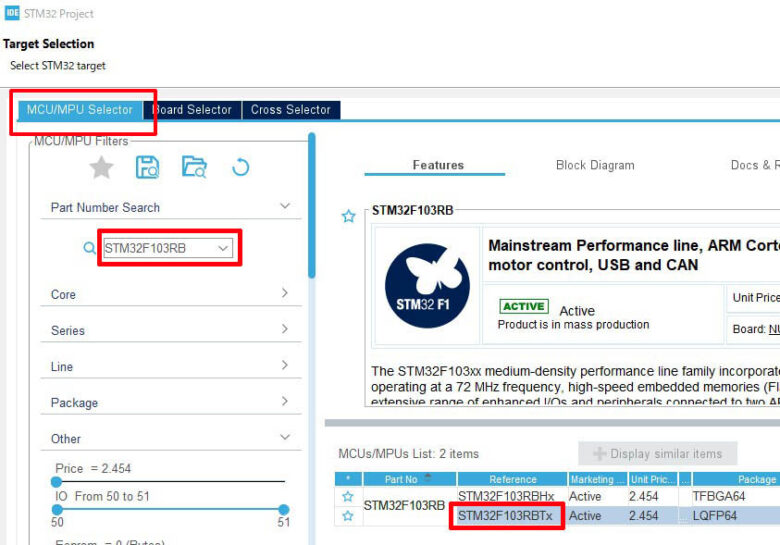
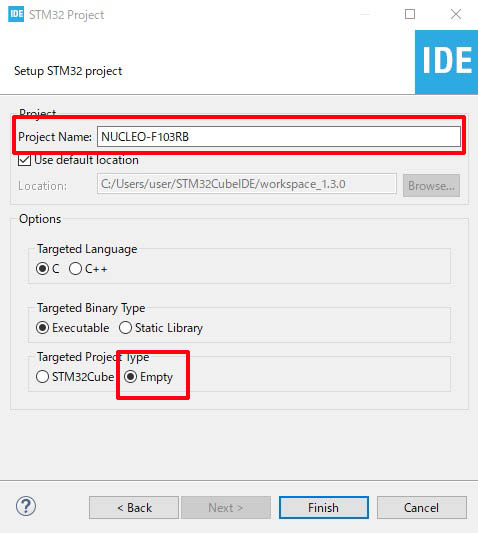
- Select the target microcontroller (MCU/MPU selector tab) to be used. In this example, STM32F103RB (LQFP64 package) is selected
- Name the project anything you like (in this case, NUCLEO-F103RB). Since the firmware library SPL is manually added to the project as a plug-in and automatic code generation is not used, specify "Empty" for the Targeted Project Type and click "Finish".
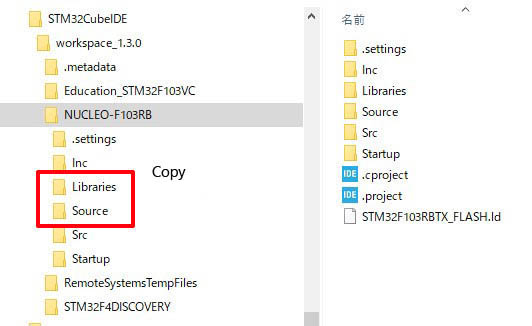
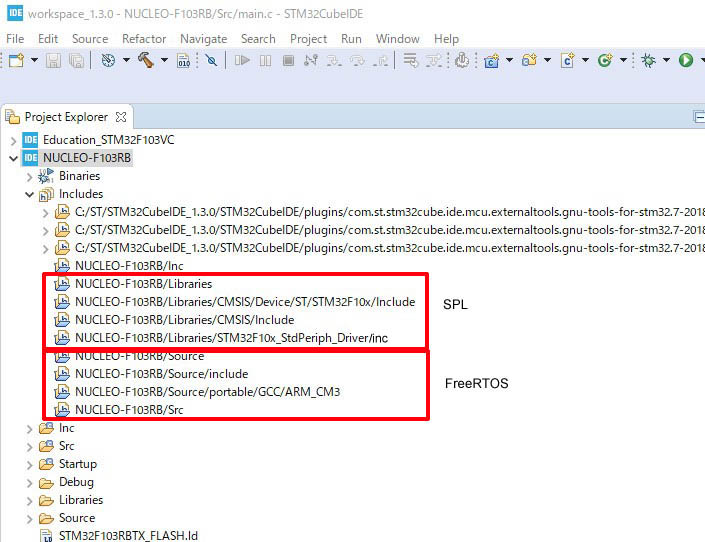
- A new project folder (in this case NUCLEO-F103RB) is created. Copy the Libraries folder containing the firmware library SPL downloaded in advance into the project folder, and since it is assumed that FreeRTOS (OS) will be used, copy the Source folder as well (e.g., using Explorer). (using a file manager).。
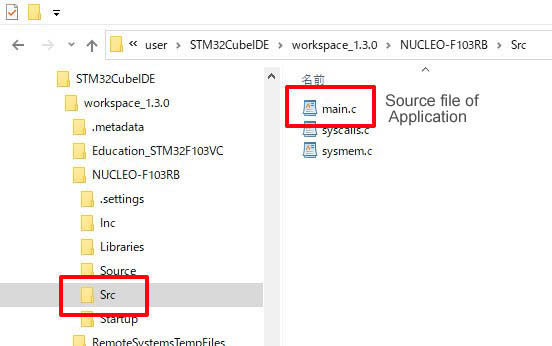
- Application programs and related header files are placed in the Src folder.
- At this stage, execute the build once using the menu bar "Project" - "Build All".
Since this is the default, the executable file should be created without error, and the added folders, etc. should be reflected in the project.
- You are now ready to go. The new project is not yet ready to use the plug-ins (SPL and FreeRTOS) that you have added with the standard specification, so you need to set the include path to the additional folder and specify the symbols to be able to use SPL.
Include path
- Select the project you wish to edit in the Project Explorer, then click on the menu bar "Project"-"Propaties" to open the properties screen. Open "C/C++ General" in the left pane and select the "Paths and Symbols" tab to open the include path settings screen.
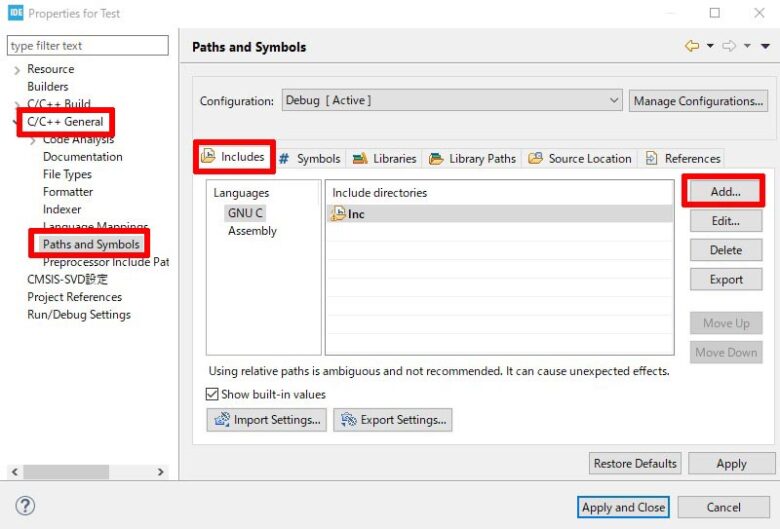
- Clicking the "Add" button on the right brings up a dialog box for specifying the path.
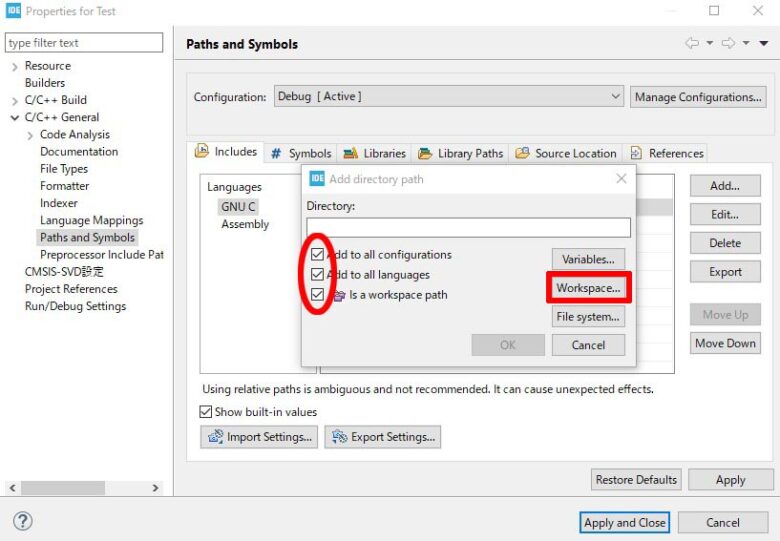
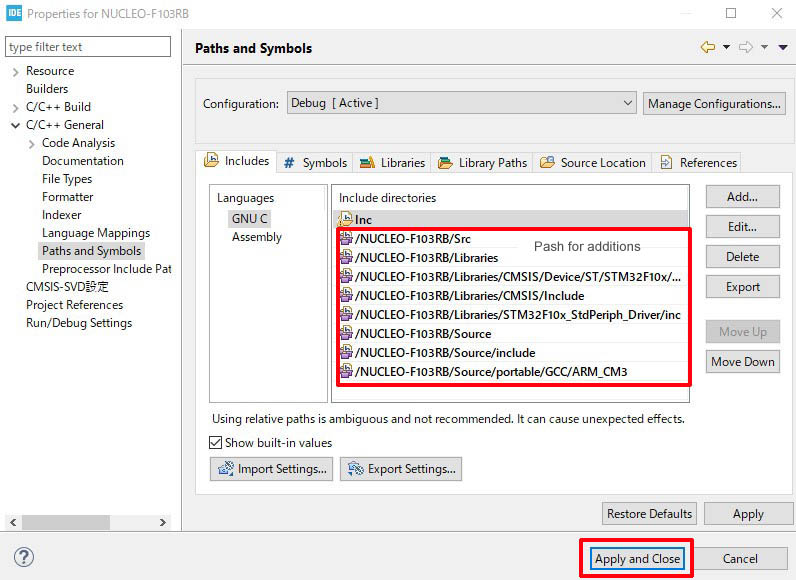
- Check all the boxes and click "Workspace", then pass through the paths in the project. If the path passes as follows, you are done.
- The project folders are as follows
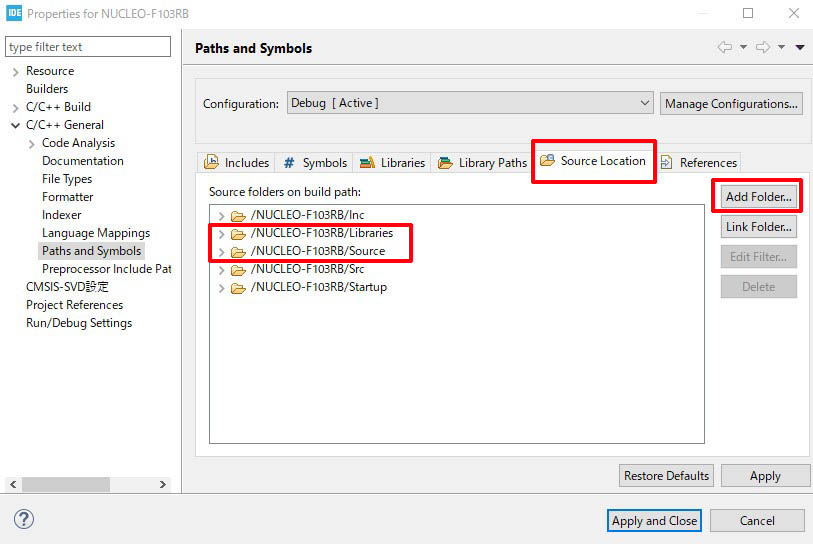
- After setting the include path, specify the location of the added plugin folder in the "Source Location" tab. Failure to do so will result in an error during build time.
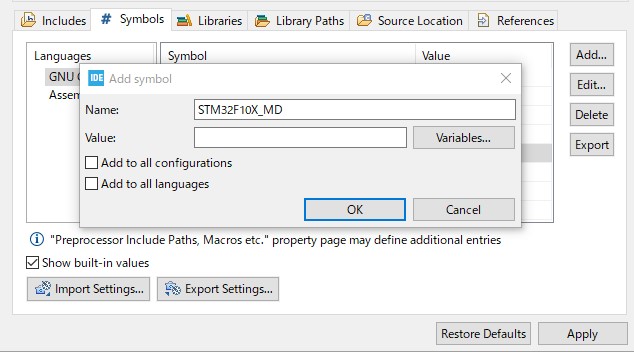
- Finally, register symbols (Symbols) that specify MPUs in the peripheral library SPL. Add the symbols as shown in the figure below.
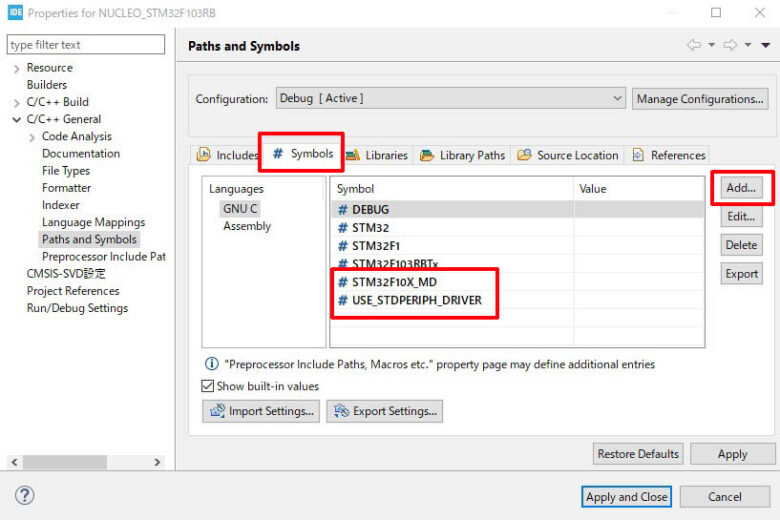
The symbol should be added to the "Name" field as is.
Leave "Value" blank.
- STM32F10X_MD
- USE_STDPERIPH_DRIVER
- This completes the development environment setup for STM32CubeIDE.
The MCU mounted on the educational material board used in this site is STM32F103RB of the STMF1 series and belongs to the Medium Desity value line (MD), so the symbol "STM32F10X_MD" is specified. The following table shows the results of the test. For MCUs mounted on other commercial boards and other than STM32F103RB, it is necessary to specify the symbol as corresponding to the type of MCU. Symbols are defined in the peripheral library system_stm32f10x.c and stm32f10x.h and are used to match the functions of each MCU. For example, the symbol "STM32F10X_MD_VL" or "STM32F10X_MD" is used for STM32VLDISCOVERY with STM32F100RB, and "STM32F10X_MD" for High For boards with STM32F103VE in the Density performance line, specify "STM32F10X_HD".
Compile-Link-Build
After the source file in C code is completed, build is performed to compile, link, and create an executable file.
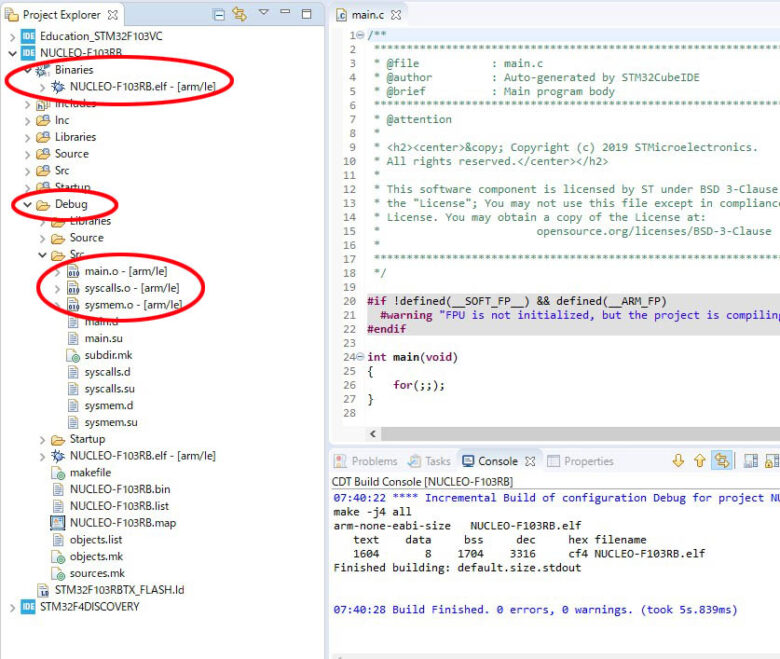
Click on the menu "Project" - "Build Project" to create the executable file.
Compile is the process of converting a source file written in C code into an object code file. The converted file has a .o extension and is stored in the "Debug" folder in the project.
If the build is successful without any errors, a "Binaries" folder will be created in the project tree and there should be a file with the extension elf. At the same time, a binary executable file with the extension bin is also created. Now all that is left is to transfer the executable file to the microcontroller using the debugger ST-Link.
Compiler error
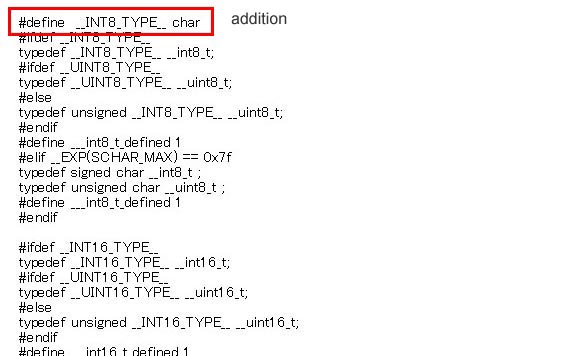
If you install STM32CubeIDE for the first time, this compilation characteristic may cause warnings during compilation due to the difference between int8_t and char.
Warning : pointer targets in passing argument 1 of 'xxxx' differ in signedness
This warning is because the compiler determines that the sign of the variable is different.
This is because the ARM specification CMSIS defines variable declarations in accordance with ISO C99, which explicitly declares even the number of bits in a variable (e.g., int8_t for 8-bit signed and uint8_t for unsigned) for ordinary char and int.
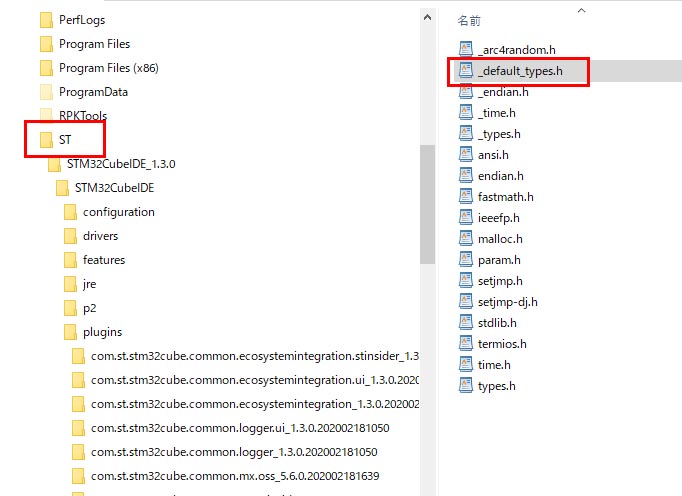
It would be better if the definition of int8_t was a char instead of a signed char, but it seems that the highest priority is given to the one defiend in _default_types.h in the "machine folder" of the toolchain (compiler), and the INT8_TYPE defined here is It turns out that the default is signed char, which is the cause of the problem. To force it to be char, add #define INT8_TYPE char in _default_types.h.
Location of _default_types.h in the "machine folder" of the toolchain (compiler)
(By default)
ST →STM32CubeIDE_xxx → STM32CubeIDE → Plugins→com.st.stm32cube.ide.mcu.externaltools.gnu-tools-for-stm32.7-2018-q2-update.win32_1.0.0.201904181610→ tools → arm-non-eabi → include → machine →_default_types.h
Transfer
MCU will function only after the executable file created by the build is transferred (written) to the flash memory of the microcontroller. The ST-LINK device is used as the transfer tool.
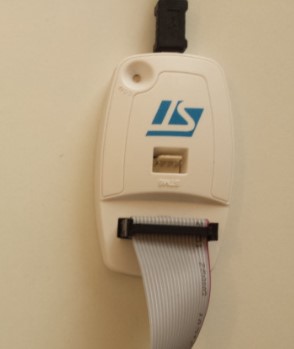
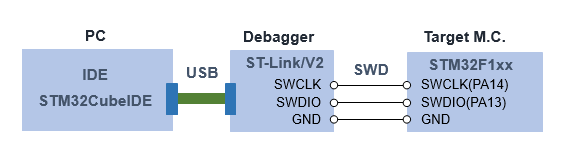
SWD method of the ARM communication standard is used to exchange data with the microcontroller side; SWD is a method of writing data with two signals (SWCLK and SWDIO).
ST-LINK(V2) tool for transfer is USB on the PC side, and two signal lines of SWD and GND on the microcontroller side.
ST-LINK V1 does not work with STM32CubeIDE, so V2 or higher is required.
Click "Run" on the menu bar, then "Debug" to start the transfer. When the transfer starts, the red LED on the ST-LINK device will start blinking. When the transfer is successfully completed, the LED will turn on or off.
The above has been explained from the construction of the development environment for the STM32 microcontroller to program transfer. Now, please try to actually operate the STM32 microcontroller and experience it through a certain amount of trial and error until the transfer writing completes smoothly and normally.
Although it is unlikely that any program, including a program, will succeed in transferring data the first time, there is always a cause for any problem, and being able to find the cause and solve it on your own is one of the skills you need to develop.
I will not explain the specifics of STM32CubeIDE operations (compiler, build, and transfer methods) here, but there is a wealth of information available on the Internet on this subject. Since STM32CubeIDE is based on eclipse, information related to eclipse may be useful.
This section describes terms commonly used in the embedded development environment. These are not essential terms, but you may hear them often, so please take a moment to familiarize yourself with them.
The evaluation boards sold by STMicroelectronics such as NUCLEO-F103RB and STM32VLDISCOVERY board with STM32F100RB used in this site come with ST-Link debugger, so you do not need to prepare external ST-Link and USB ST-Link devices are required for STM32 boards from other manufacturers and newly designed microcontroller boards.
Self and Cross Environments
Self-environment is an environment where the development environment and execution environment are the same, for example, application development using Visual C# on a PC. In contrast, a cross-environment is an environment where the development environment and execution environment are separate, and applications are developed on a separate PC for embedded devices that do not have their own development environment. Embedded devices use a variety of CPUs and OSs, so development is performed in a cross-environment.
The PC on which the program is created is called the host computer (development computer). Embedded devices are called target computers. Compiling a program for the target is called a cross-compiler/assembler/linker, libraries are called cross-libraries, and program pugging is called a cross-debugger. You will often hear the above terms used when building a development environment.
"Why I recommend STM32Nucleo instead of Arduino for beginners in MCU learning" explains the advantageous points about the learning method using the development environment employed on this site.
The tools for microcomputer development environment introduced on this site are provided free of charge. To download them, please register using the contact form and obtain a password.